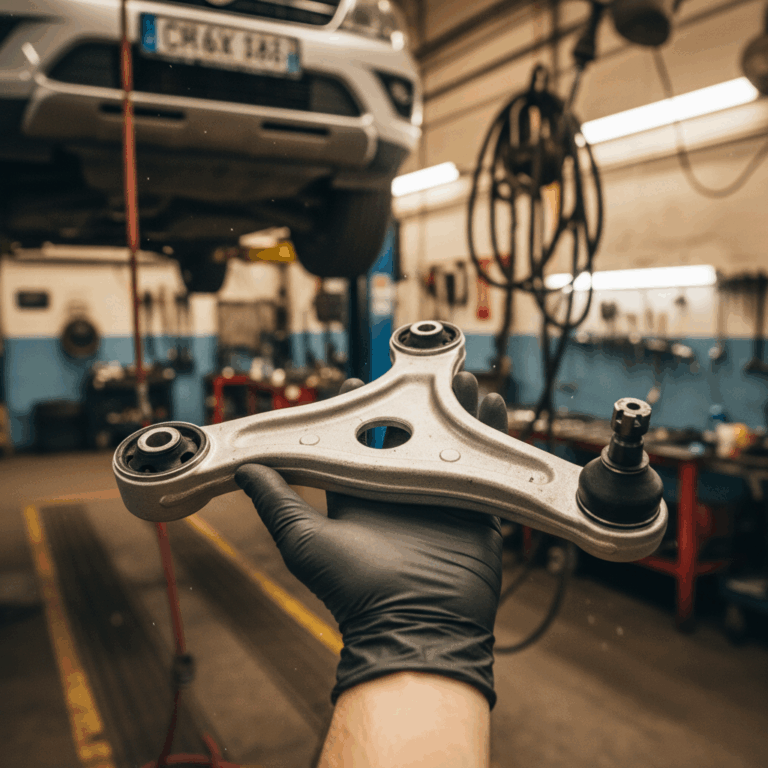
A lower control arm is built from three parts that matter. The arm body. The bushings where it bolts to the frame. The ball joint where it connects to the wheel. That’s the whole anatomy. The body is the A-shaped or L-shaped piece you can see, usually stamped steel. The bushings are the rubber-and-metal sleeves at the frame end. The ball joint is the swiveling stud at the wheel end. Understand those three and you understand why a control arm fails where it does. After six years pulling these off cars at a Toyota and Lexus shop in Fullerton, and a few more on mobile jobs around Orange, I can tell you it’s always the same two parts.
I’ll walk you through each piece. When a mechanic says your bushing is shot or your ball joint has play, you’ll know what he’s pointing at.
Key Points to Review
- A lower control arm has three functional parts: the arm body, the bushings (frame side), and the ball joint (wheel side).
- The arm body rarely fails. The bushings and ball joint are the wear parts that drive replacement.
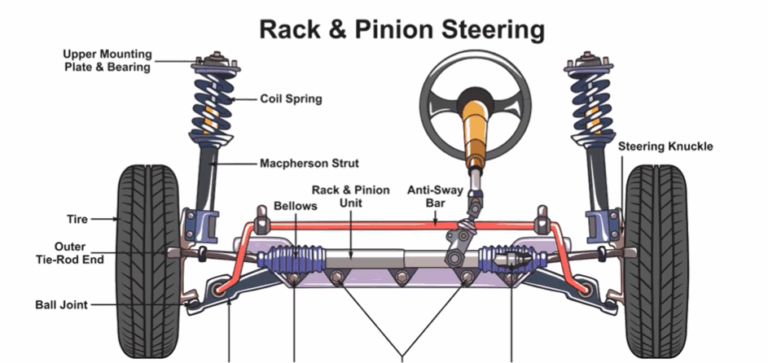
- The arm connects the steering knuckle to the frame, locating the wheel while letting it move and steer.
- Front lower control arms carry a ball joint; many rear lower arms bolt at both ends with no ball joint.
- Most replacement arms come as a complete assembly with the bushings and ball joint already installed.

What Is a Lower Control Arm?
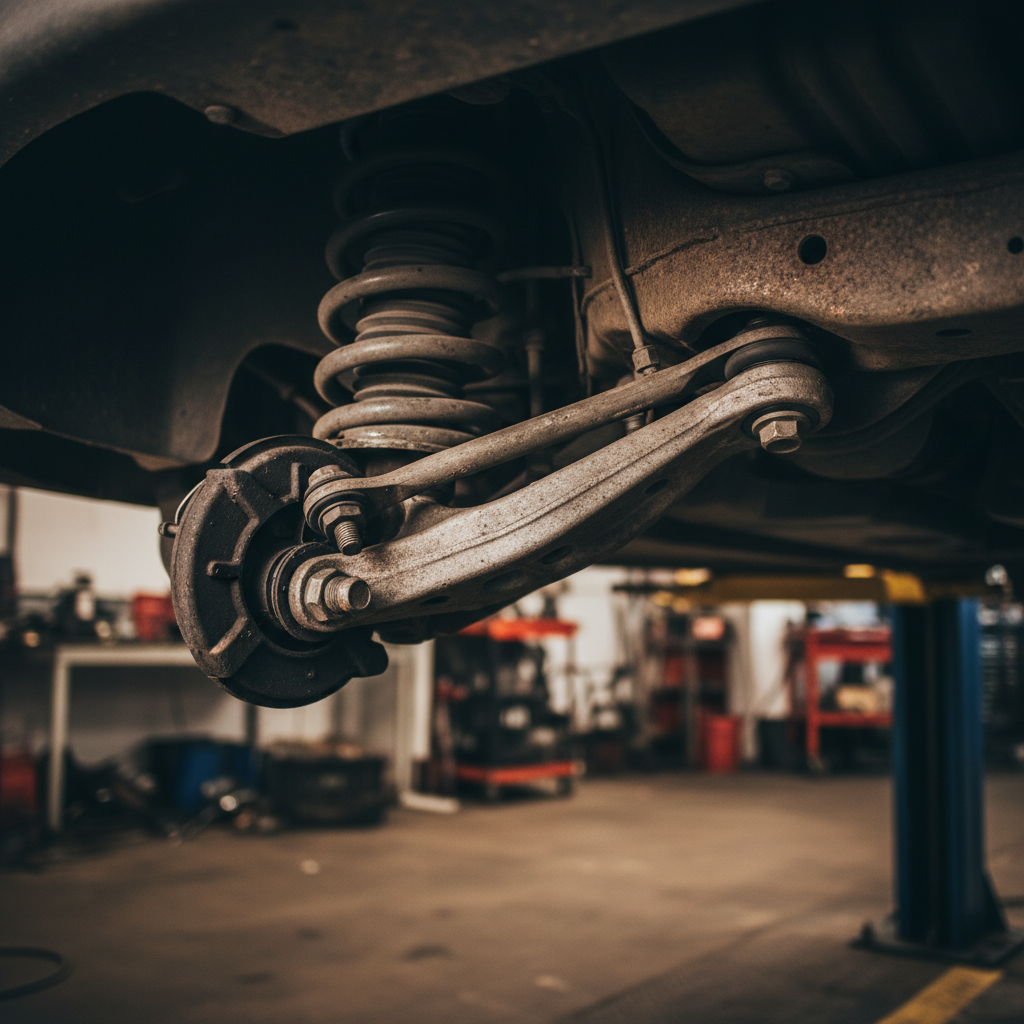
A lower control arm is the suspension link that connects the bottom of the steering knuckle to the vehicle’s frame or subframe. It holds the wheel in position while letting it move up and down. On the front, it also lets the wheel steer. Some folks call it an A-arm or a wishbone because of the shape. Same part.
It’s one of the hardest-working pieces of the suspension. That’s why it’s built around wear parts. The arm itself is structural and tough. The pivots and the joint are where rubber and grease live. Rubber and grease have a shelf life. For a deeper look, here’s what a lower control arm does.
Lower Control Arm Diagram: The Main Parts
Picture the arm laid out flat. The wide end with two mounting points faces the frame. The narrow end with the ball joint faces the wheel. Here’s every part.
The Arm Body
The arm body is the main structural piece. Stamped steel on everyday cars. Cast aluminum or forged steel on performance stuff. Its job is to stay stiff and hold the bushings and ball joint in their exact positions. The body almost never wears out on its own. It can bend or crack in a hard pothole hit or a collision. On a normal car it outlives everything bolted to it. When you “replace a control arm,” you’re really replacing the body to get fresh bushings and a fresh joint with it.
The Bushings
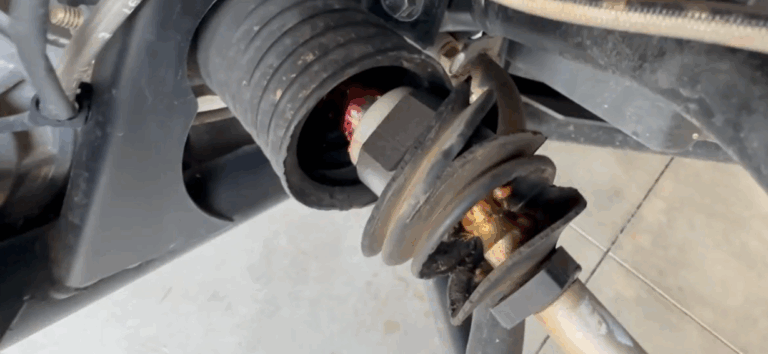
The bushings are the rubber-and-metal sleeves pressed into the frame end of the arm. They let it pivot up and down while soaking up road vibration. There are usually two. They take a beating. Heat cycles, oil exposure, and every pothole work the rubber until it cracks, tears, or separates from its sleeve. Worn bushings give you a clunk over bumps and let the wheel shift under load, which throws off your alignment. They’re the most common reason I’m pulling a control arm in the first place. Had a Camry come in around 110,000 miles last spring with a clunk over every driveway. Both bushings were already split top and bottom. Classic. I covered the full story on lower control arm bushings and replacement costs if that’s your issue.
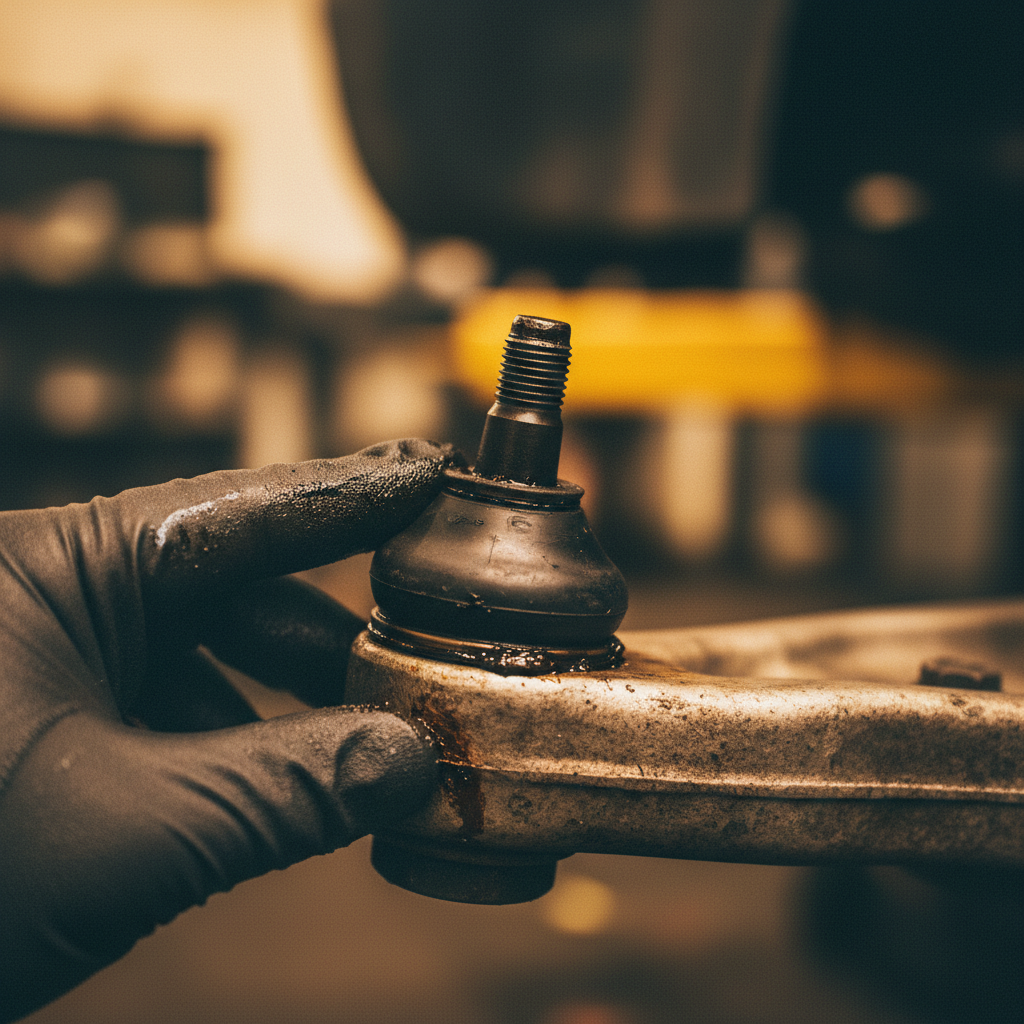
The Ball Joint
The ball joint is the swiveling connection at the wheel end. A tapered stud inside a greased socket that lets the wheel steer and move over bumps at the same time. On most vehicles the lower ball joint is built right into the control arm assembly. It carries real load. When the grease dries out or the joint wears, you get play, a clunk on turns, and in the worst case, separation. A separated ball joint drops the wheel. That’s why it’s the part of the assembly I respect most. The lower control arm ball joint has its own failure pattern worth knowing.
The Mounting Hardware
The mounting hardware is the set of pivot bolts that thread the arm into the frame, plus the pinch bolt or castle nut that secures the ball joint to the knuckle. Sounds like an afterthought. It isn’t. A lot of jobs go sideways here. Many of these bolts are torque-to-yield and meant for one-time use. They have specific torque values that have to be set with the suspension loaded. Get the lower control arm torque specs wrong and even a perfect new arm fails early. Had an F-150 come back two months after a friend’s driveway job because he ran the old bolts back in. Bushings were already walking out of the arm.
How the Parts Work Together
The three parts split the work cleanly. The bushings handle the pivot at the frame. The ball joint handles the steering swivel and the up-and-down at the wheel. The arm body ties them together and holds the geometry. Hit a bump, the arm swings, the joint flexes, the wheel stays where the engineers put it. Turn the wheel, the joint rotates while the arm holds. Simple. It works great until one of the moving parts wears out.
What Connects to a Lower Control Arm?
Knowing what bolts to the arm helps you trace a clunk to the right place. Plenty of suspension noises get blamed on the control arm when the real culprit is right next door. The lower control arm connects to four things: the steering knuckle (through the ball joint), the frame or subframe (through the bushings and pivot bolts), the sway bar (through the sway bar end link), and on many vehicles the strut or shock sits just above it. That sway bar link is a frequent clunk culprit. Cheap, separate part. Mistaken for a bad control arm all the time. My guide to car suspension components lays out how all of these fit together.
Front vs. Rear Lower Control Arm Shapes
Front and rear lower control arms look and work differently. The shape tells you what the part has to do. Front lower arms are the classic A-shape or L-shape with a ball joint at the wheel end, because the front wheels steer. Rear lower arms on an independent rear suspension are simpler straight or curved links that bolt at both ends with no ball joint. The rear wheels don’t steer on most vehicles. Some rear setups use several arms per side to control toe and camber separately. And before anyone asks: yes, you still get an alignment after replacing a rear lower arm. The number of people who skip that step is ridiculous. If you’re comparing the lower arm to the one above it, I broke down upper vs lower control arms in detail.
Signs a Lower Control Arm Part Is Failing
Because the wear lives in the bushings and ball joint, the warning signs point right at them. Watch for a clunk or knock over bumps. That usually means a bushing. A clunk specifically on turns, or steering that feels loose and wandering, leans toward the ball joint. Uneven or rapid tire wear can come from worn bushings letting your alignment drift. Suspension and steering parts in this kind of worn condition are among the issues NHTSA connects to loss of vehicle control. A clunk that keeps getting worse is worth checking sooner rather than later. For the full rundown, here’s the bad lower control arm symptoms guide. When it’s time to fix it, Detroit Axle carries complete control arm assemblies with the bushings and ball joint already installed and a 10-year warranty on many of them. Engineering standards for these suspension joints, like those published by SAE International, are part of why a quality assembly holds up where a bargain part doesn’t.
FAQs
What are the parts of a lower control arm?
The parts of a lower control arm are the arm body, the bushings, and the ball joint, plus the mounting hardware that holds it all to the vehicle. The arm body is the structural A-shaped or L-shaped piece. The bushings let it pivot at the frame. The ball joint connects it to the steering knuckle at the wheel. The bushings and ball joint are the wear items; the body itself rarely fails.
What connects to a lower control arm?
A lower control arm connects to the steering knuckle through its ball joint, to the frame or subframe through its bushings and pivot bolts, and to the sway bar through the sway bar end link. On many vehicles the strut or shock also mounts just above it. Because so many parts meet here, a clunk blamed on the control arm is sometimes actually a worn sway bar link or a bad strut mount.
Is the ball joint part of the lower control arm?
On most modern vehicles the lower ball joint is part of the control arm assembly and is replaced together with the arm. On some trucks and older vehicles the ball joint is a separate bolt-in or press-in part that can be replaced on its own. Check your specific vehicle, because it changes both the repair and the cost.
Can you replace just the bushings on a lower control arm?
You can replace just the bushings on a lower control arm, but it requires a press to remove the old ones and install the new, and it leaves the original ball joint in place. For most daily drivers, installing a complete control arm assembly with new bushings and a new ball joint already pressed in is faster and often costs about the same once press time is counted. Bushings-only makes sense on a performance or specialty arm worth keeping.